
Managed Mesh
Managed mesh connects two or more RC500 routers with a secure 802.11s / B.A.T.M.A.N. Advanced backhaul. Use it when one RC500 has the best internet path and nearby RC500 routers need to share that uplink or extend the private LAN.
What you need
Section titled “What you need”Before you start:
- At least two RC500 routers assigned to the same organization in Telisky Cloud.
- Both routers powered on and close enough for WiFi backhaul during setup.
- At least one router with working internet through Ethernet, cellular, or upstream WiFi.
- Access to Devices → Router settings → Managed mesh in MDM, or local access to
http://192.168.4.1. - A mesh name and key if you want to pre-provision manually instead of using button pairing.
Fast path: pair two routers with the mesh button
Section titled “Fast path: pair two routers with the mesh button”Use this when both routers are already enrolled in the same Telisky organization.
- Put the routers near each other for setup.
- Confirm both routers are powered on. The controller should have a working internet path.
- Find the physical mesh button. It may be labeled Mesh or use the mesh/backhaul icon; if your enclosure does not expose a labeled mesh button, use the MDM or local Web UI setup path instead.
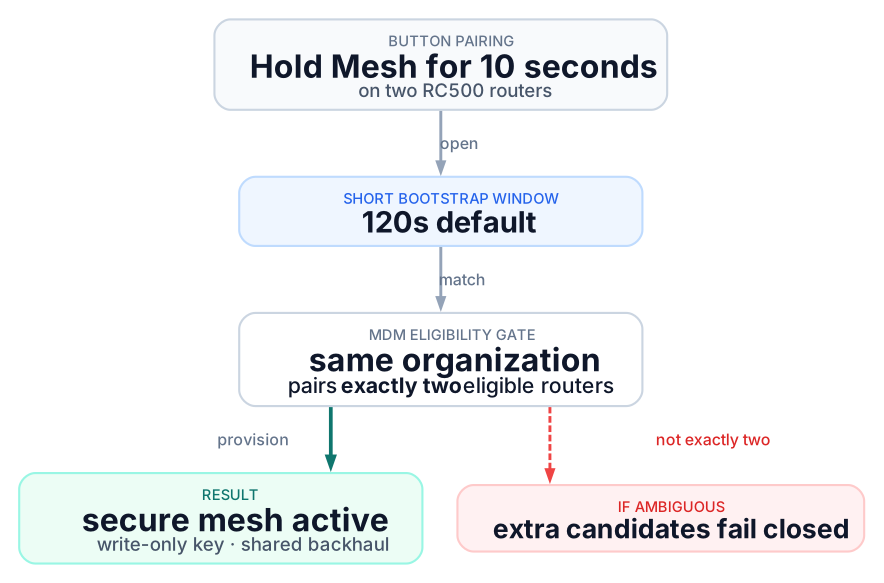
- On the first router, hold the physical mesh button for 10 seconds.
- On the second router, hold the physical mesh button for 10 seconds.
- Wait during the pairing window. The firmware default window is 120 seconds. The router’s mesh LED state may show the hold, pairing window, and mesh-active state during this flow.
- In MDM, open either router and go to Router settings → Managed mesh.
- Confirm Mesh mode is on and Peers shows at least one peer.
If exactly two same-organization routers open pairing during the window, MDM can generate and push the mesh credentials. If more than two eligible routers are open at the same time, pairing fails closed so the wrong routers are not joined.
Add a third or later router
Section titled “Add a third or later router”Button pairing is intentionally a two-router bootstrap. For a larger site, build the first two-router mesh, then add each additional satellite with the same saved mesh settings.
- Leave the working controller online. This is the router with the best internet path.
- Do not 10-second-hold the mesh button on the active controller. A long hold on a router that already has mesh enabled turns mesh off.
- In MDM, create or reuse one Managed mesh config profile for the site. If the router is offline from cloud but reachable on-site, use the local Web UI instead.
- Apply the profile to the new satellite router:
- Enabled: on
- Mesh ID: same value as the working mesh
- Mesh key replacement: same saved key if the new router does not have it yet
- Backhaul band and channel: same values as the working mesh
- Role:
autofor normal installs, ornodewhen you explicitly want this router to be a satellite
- Save/apply the settings and wait for the MDM job to finish, or save locally and wait for mesh status to update.
- Open Router settings → Managed mesh on the controller, or the controller’s local Web UI, and confirm Peers increased.
- Repeat for each additional satellite, one router at a time.
When using the local Web UI for a third or later router, copy the working mesh’s Mesh ID, key, band, and channel exactly. Local setup does not need cloud auto-pairing, but the values still must match.
For a standard yard, vehicle lot, or small facility, keep one controller/router as the LAN and uplink owner. Leave Share controller uplink and Bridge private LAN on so satellites can carry clients back to that controller. Do not let satellite routers run a duplicate LAN gateway or DHCP server for the same bridged LAN.
Set up mesh from MDM
Section titled “Set up mesh from MDM”Use the MDM form when you want to prepare a repeatable mesh profile or apply the same settings to a fleet.
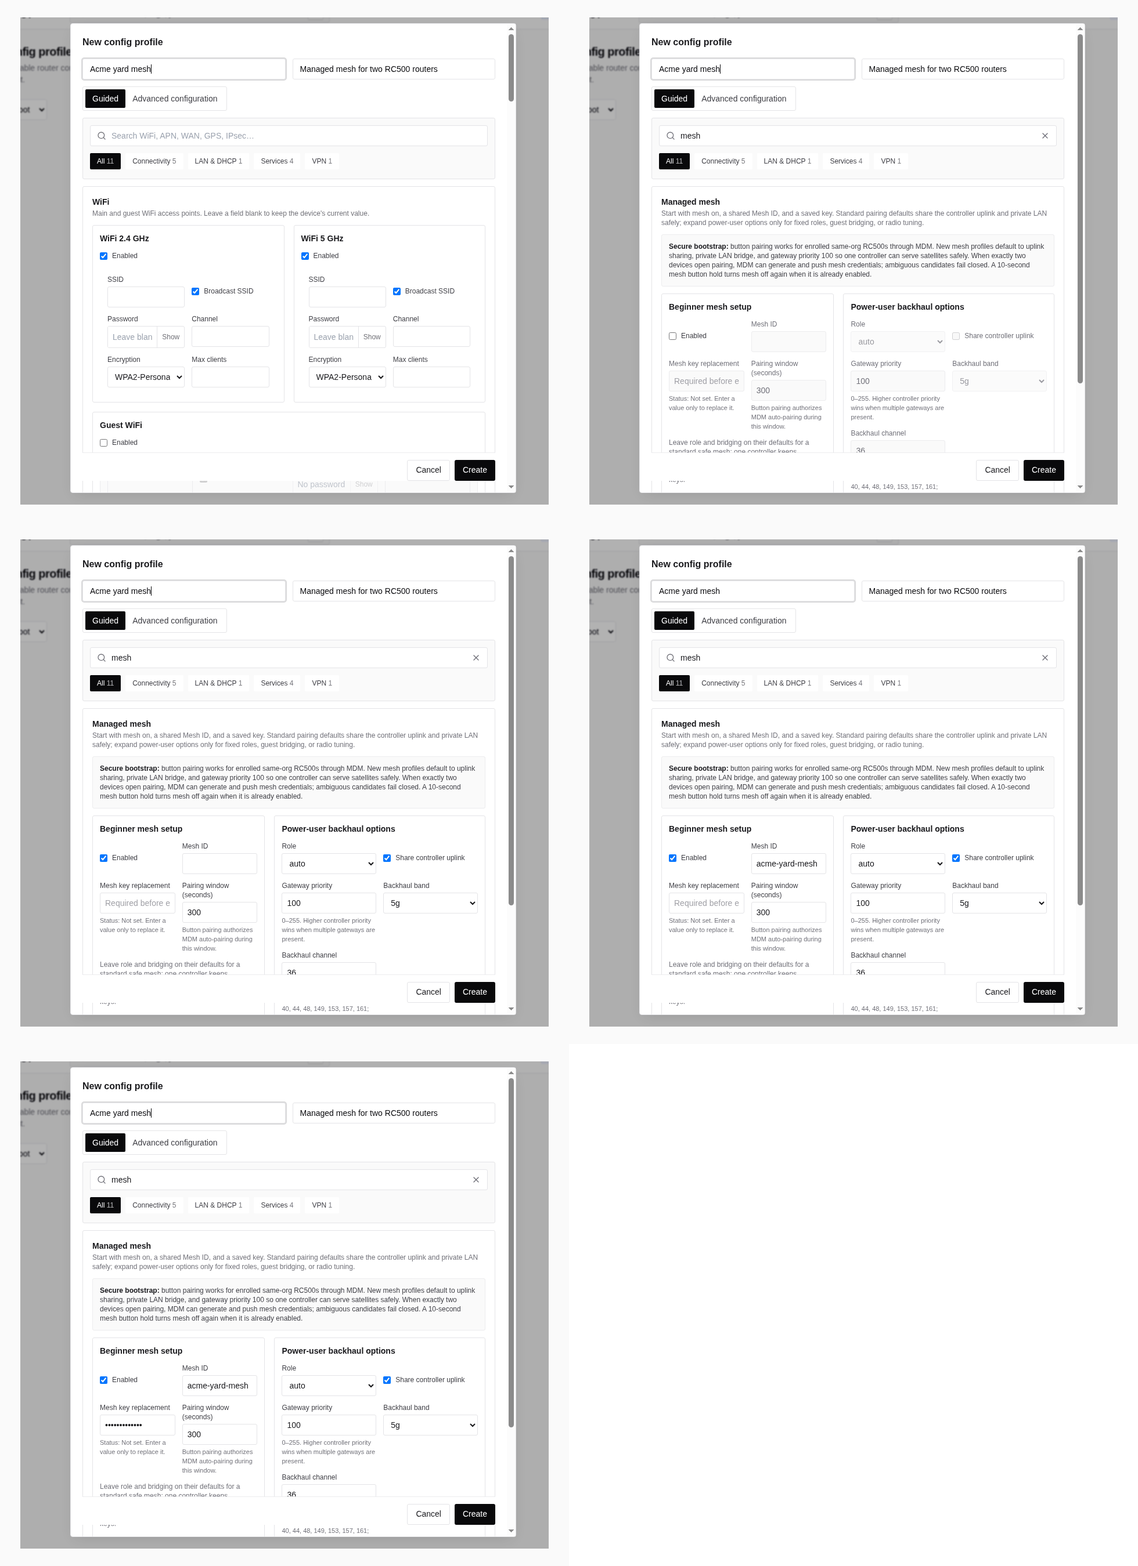
- Open Config profiles or a single device’s Router settings.
- Search for Managed mesh.
- Turn Enabled on.
- Enter a Mesh ID. Use the same Mesh ID on every router in the mesh.
- Enter a Mesh key replacement if no key is saved yet, or leave it blank to keep the saved key.
- Keep the defaults for a first install:
- Role:
auto - Backhaul band:
5g - Backhaul channel:
36 - Pairing window:
120 - Share controller uplink: on
- Bridge private LAN: on
- Gateway priority:
100
- Role:
- Save the profile or review and apply the router settings.
- Track the resulting job until it succeeds.
- Return to Router settings → Managed mesh and confirm peer status.
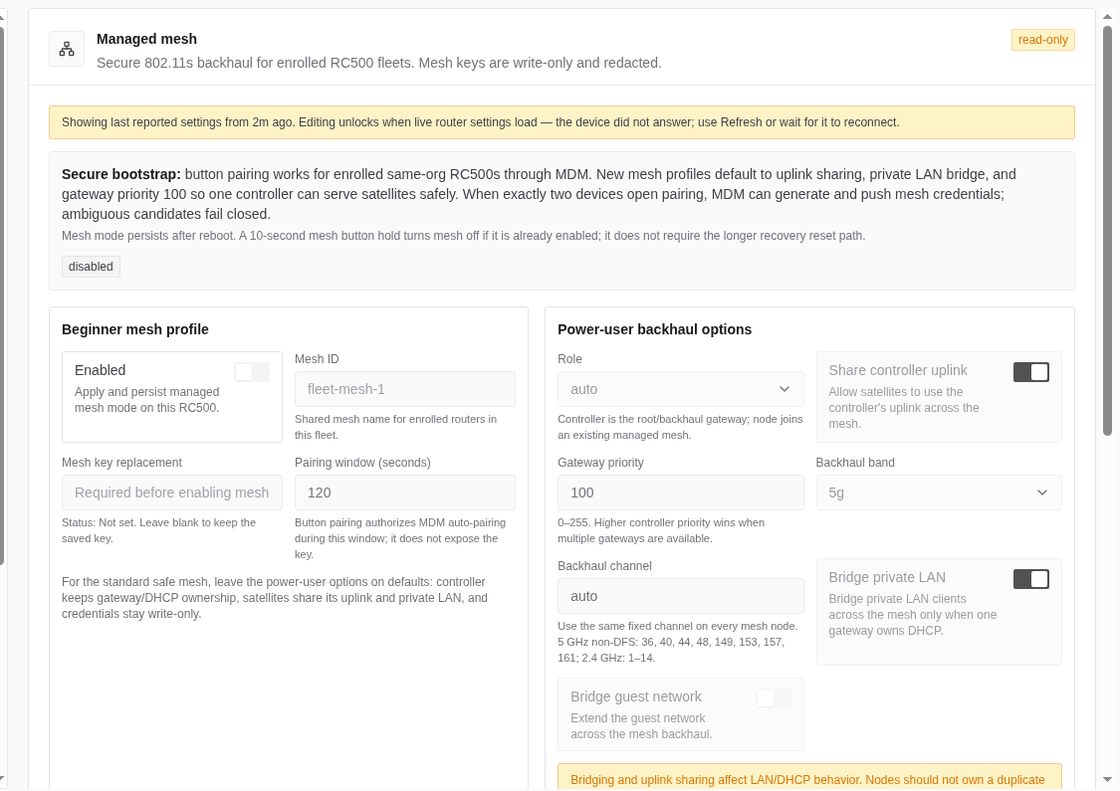
Use the local Web UI
Section titled “Use the local Web UI”Use the local Web UI when you are on-site or when cloud access is not available.
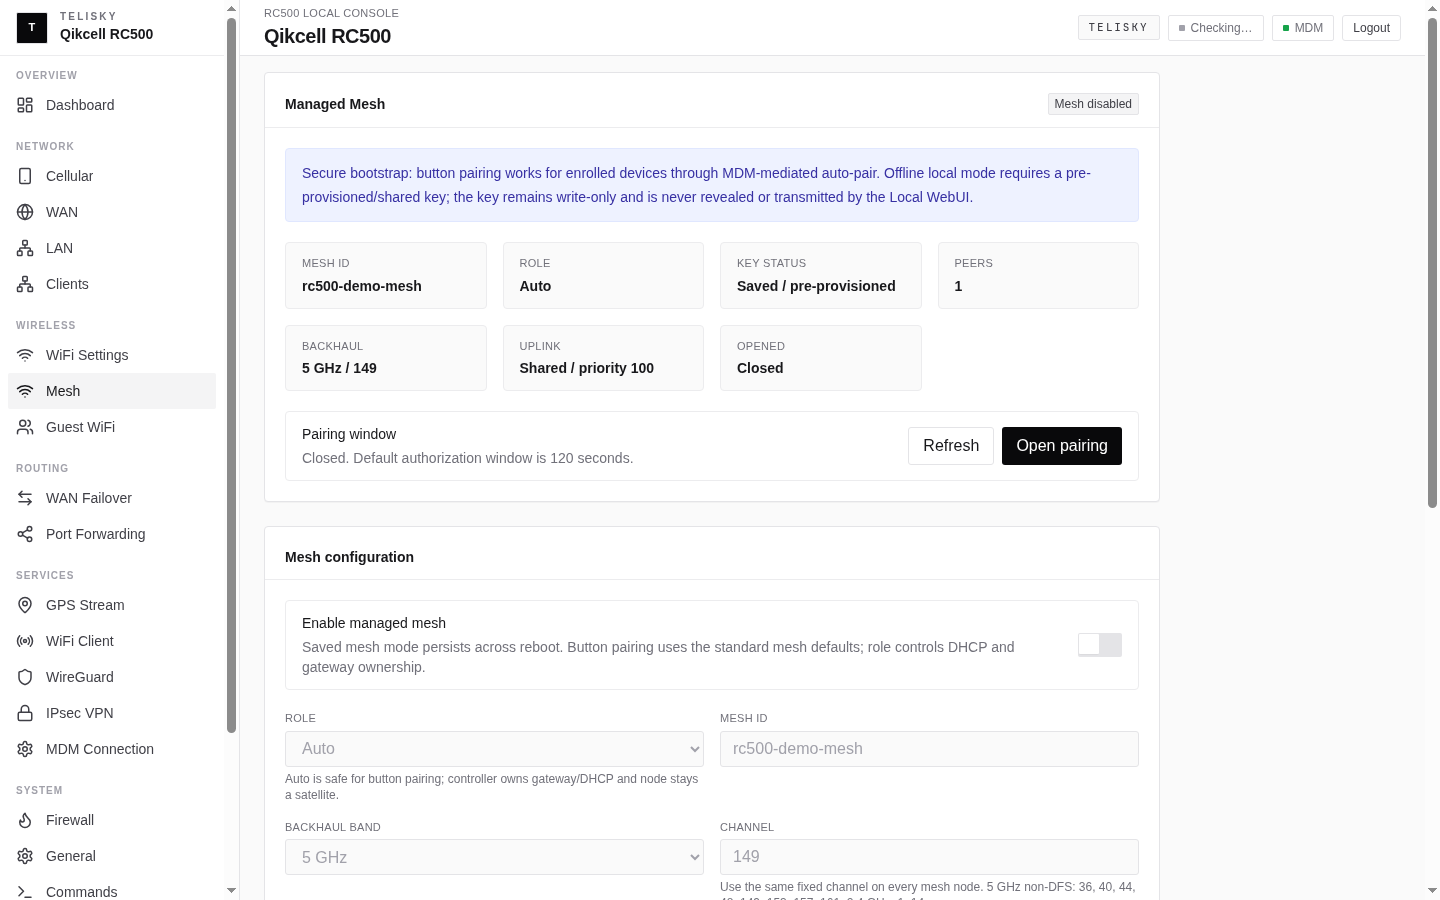
- Connect to the router’s LAN or WiFi.
- Open
http://192.168.4.1. - Sign in to the local Web UI.
- Open the Managed mesh page.
- Enable mesh and enter the same Mesh ID, key, band, and channel used by the other routers.
- Save and wait for the mesh status to update.
The local Web UI can operate offline if the routers already share a pre-provisioned Mesh ID and key. Cloud auto-pairing requires the routers to be enrolled in the same MDM organization and reachable by MDM during the pairing window.
Settings reference
Section titled “Settings reference”| Setting | Use | Rules |
|---|---|---|
| Enabled | Turns managed mesh on and persists it across reboot. | Hold the physical mesh button for 10 seconds again to disable mesh when it is already enabled. |
| Mesh ID | Shared mesh name. Every router in the mesh must match. | 1–32 characters. Use only letters, numbers, dots, dashes, underscores, or colons. |
| Mesh key replacement | Shared secret for the mesh. | 8–63 printable characters, or exactly 64 hex characters. The saved key is write-only and redacted after save. |
| Pairing window | How long button pairing stays open. | 30–600 seconds. Firmware default: 120 seconds. |
| Role | controller, node, or auto. | Start with auto. Use controller for the gateway router and node for satellites only when you need fixed roles. |
| Backhaul band | Mesh radio band. | 5g or 2g. Default: 5g. |
| Backhaul channel | Fixed mesh channel. | Required when mesh is enabled. 5 GHz: 36, 40, 44, 48, 149, 153, 157, or 161. 2.4 GHz: 1–14. Use the same fixed channel on every node. |
| Share controller uplink | Lets satellite nodes use the controller’s internet path. | Default: on. Make sure only the controller owns the upstream gateway. |
| Bridge private LAN | Extends private LAN clients across the mesh. | Default: on. Avoid duplicate DHCP/gateway ownership on satellite nodes. |
| Bridge guest network | Extends guest WiFi across the mesh. | Default: off. Enable only if guests should roam across the mesh. |
| Gateway priority | Selects the preferred controller when more than one gateway is available. | 0–255. Default: 100. Higher wins. |
What success looks like
Section titled “What success looks like”In Router settings → Managed mesh, a working mesh should show:
- Mesh mode:
on / persistent - Key:
Saved / redacted - Pairing: closed after pairing completes
- Peers: at least
1on a two-router mesh; for larger sites, each router should see the expected neighboring peers for its placement - Runtime status: running or healthy
- Band / channel: the same values on every router
On-site, devices connected to a satellite router should be able to reach the controller’s uplink when Share controller uplink is on.
Fix common problems
Section titled “Fix common problems”| Problem | What to check |
|---|---|
| No Managed mesh page | Update firmware and confirm your cloud portal build includes Managed mesh. |
| Pairing never completes | Hold the mesh button for 10 seconds on exactly two same-organization routers. Repeat with only those two routers in the pairing window. |
| No peers reported | Confirm both routers use the same Mesh ID, key, band, and fixed channel. Move them closer during setup. For larger sites, add one satellite at a time and verify the peer count after each job. |
| Settings will not save | Mesh ID, key, channel, pairing window, and gateway priority must match the rules above. |
| Clients get bad addresses | Check LAN/DHCP ownership. With private LAN bridge or uplink sharing on, satellite nodes should not act as a duplicate LAN gateway. |
| Third router will not join | Do not open button pairing on every router at once. Apply the existing mesh profile to the new satellite, keep the same Mesh ID/key/band/channel, and confirm the controller is still online. |
| Router is offline in MDM | Use the local Web UI to inspect mesh status, then see Router offline or silent. |
If you still cannot pair the routers, collect the router names, serials, organization, firmware versions, pairing time, and a screenshot of the Managed mesh status panel before contacting support.